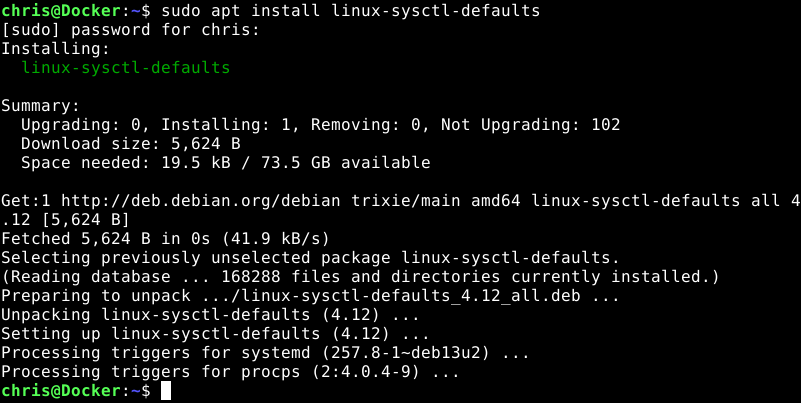
I came across an issue with trying to use the ping command after I installed the latest SparkyLinux (A Debian based distro). It would only work when run as sudo, but I got an error, “missing cap_net_raw+p” when run as a normal user. After some digging, I found the solution on a blog post at ShallowSky.com. https://shallowsky.com/blog/linux/ping-permissions.html
Ping command not working. missing cap_net_raw+p.
The fix? Installlinux-sysctl-defaults then reboot your machine.
I use Action1 to manage endpoints across many locations. The one thing Action1 is not excellent at and does not plan to be is a great remote access tool. Self-hosting RustDesk fits in perfectly for this need. I created a powershell script that can be run via Action1 to quickly install the RustDesk client onto all my endpoints silently along with adding a custom value to Action1 to let me know the RustDesk ID of each endpoint. This post is not about how to create your own self-hosted version of RustDesk, merely, show an example of how to deploy it via Action1 (Or similar tool) easily via a powershell automation.
The script below is sequential is very easy to follow. Modify it as you need.
Action1 Portal showing RustDesk ID fed via install script.
<#
.NOTES
    Author: C. Weis
    Versions:
    251203 Initial

.SYNOPSIS
    Install RustDesk client.

.DESCRIPTION
    Install RustDesk client with custom self hosted settings.
    Example created to show deployment via Action1.

.EXAMPLE
    [PS] C:\>.\RustDesk-Installer.ps1

#>


<# --------------------------------------------------------------------------------
	RustDesk configuration file.

    This is the contents of a file that will be created to replace configuration
    file that RustDesk installer creates. This file will contain info for self
    hosted server and key file.
----------------------------------------------------------------------------------- #>
$rd_config = @"
rendezvous_server = 'rs-ny.rustdesk.com:21116'
nat_type = 1
serial = 0
unlock_pin = ''
trusted_devices = ''

[options]
custom-rendezvous-server = 'PATH OR IP OF YOUR SELF HOSTED SERVER HERE'
direct-server = 'Y'
av1-test = 'N'
allow-remote-config-modification = 'Y'
key = 'YOUR CUSTOM KEY FILE CODE HERE'
relay-server = 'PATH OR IP OF YOUR SELF HOSTED SERVER HERE'
"@


<# --------------------------------------------------------------------------------
	Download Rustdesk MSI and drop into Temp directory.
----------------------------------------------------------------------------------- #>
$rd_src = 'https://github.com/rustdesk/rustdesk/releases/download/1.4.4/rustdesk-1.4.4-x86_64.msi'
$rd_dst = "$env:TEMP\rustdesk-1.4.4-x86_64.msi"

Invoke-RestMethod -Uri $rd_src -OutFile $rd_dst


<# --------------------------------------------------------------------------------
	Start Installation.
----------------------------------------------------------------------------------- #>
Write-Host "Calling Installer: $rd_dst"
Start-Process 'msiexec' -ArgumentList "/i ""$rd_dst"" /qn INSTALLFOLDER=""C:\Program Files\RustDesk"" CREATESTARTMENUSHORTCUTS=""Y"" CREATEDESKTOPSHORTCUTS=""N"" INSTALLPRINTER=""N"" /l*v RDinstall.log" -Wait

# This delay is needed for lower end devices to finish installation process successfully.
Write-Host "Install completed. Pausing 30 Seconds."
Start-Sleep -Seconds 30


<# --------------------------------------------------------------------------------
	Stop service and drop in new config file.
    This assumes script being run as localsys.
----------------------------------------------------------------------------------- #>
Stop-Service -Name RustDesk

$rd_configpath = 'C:\WINDOWS\ServiceProfiles\LocalService\AppData\Roaming\RustDesk\config'
$rd_config | Out-File -FilePath "$rd_configpath\RustDesk2.toml" -Encoding UTF8 -Force

Start-Service -Name RustDesk


<# --------------------------------------------------------------------------------
	Set Password

    Password is created based partially on machine name.
    Grab second through the fith characters of computername to create first
    part of password. Then add additional string: ##Soda.
----------------------------------------------------------------------------------- #>
$rd_app = "C:\Program Files\RustDesk\RustDesk.exe"

$rd_pass = $Env:computername
$rd_pass = $rd_pass.Substring(1, 4) + "##Soda"

Start-Process $rd_app -ArgumentList "--password $rd_pass"

Write-Host "Password Set: $rd_pass"


<# --------------------------------------------------------------------------------
	Retrieve key ID number.

    Send to Text file in program directory and push to Action1 custom attribute.
----------------------------------------------------------------------------------- #>
$rd_id = & $rd_app --get-id | Out-String
$rd_id = $rd_id.Trim()

$rd_id | Out-File -FilePath "C:\Program Files\RustDesk\RustDesk-ID.txt" -Encoding UTF8 -Force

# Have Action1 set the RustDesk ID to a custom attribute named, "RustDesk ID".
Action1-Set-CustomAttribute 'RustDesk ID' $rd_id
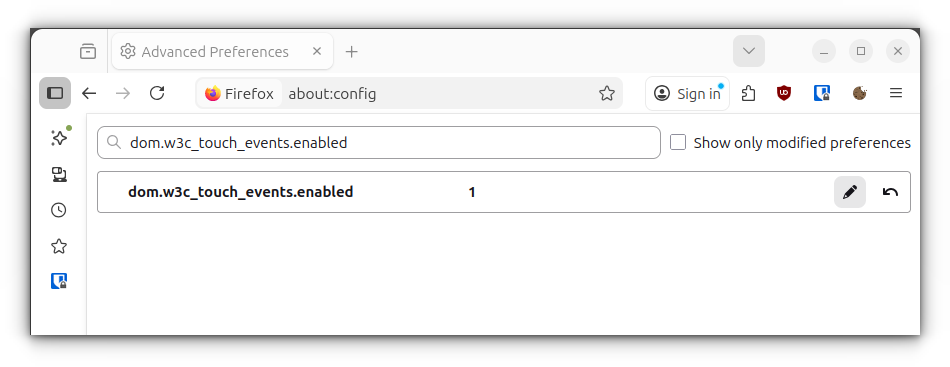
I updated my laptop to Ubuntu 25.10 which no longer has Xorg. Since I am not a fan of Wayland due to issues with some applications I use have with Wayland, I decided to install the Mate desktop environment which has Xorg support. I then noticed that Firefox does not work well with touchscreens (No pinch and zoom and scrolling) unless you make a couple of adjustments. Below is what worked for me to resolve this issue.
Open Firefox and go to about:config. Search for dom.w3c_touch_events.enabled. Set the value to 1.
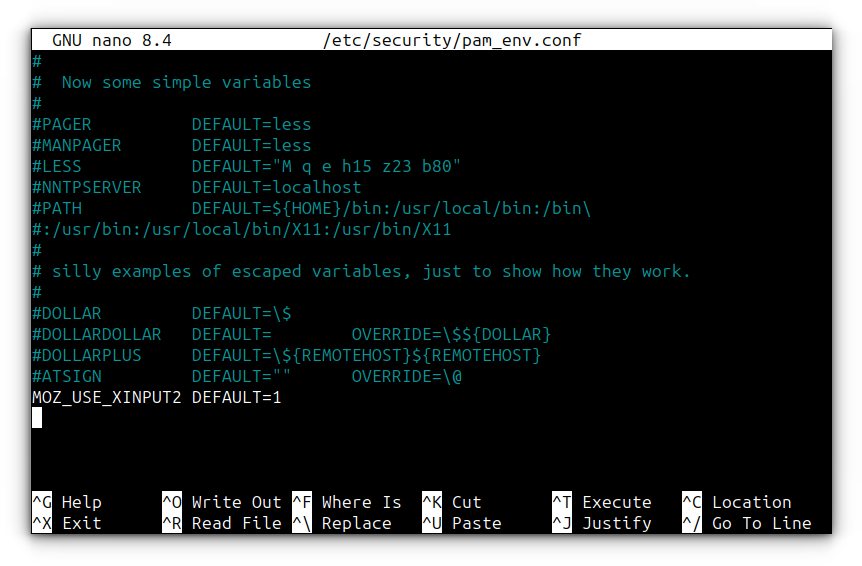
Now open the file /etc/security/pam_env.conf and add this line to the bottom of the file: MOZ_USE_XINPUT2 DEFAULT=1 Save the file. Then reboot your computer. Touchscreen support such as pinch and zoom should now work just fine.
I like having a bootable partition on my external drives and larger USB flash drives. This makes a great emergency rescue, cloning device or a bootable private PC environment without disrupting the actual computer and without taking up much space on the external drive.
The 2 bootable images I like to use on external devices are:
There is a cost involved with Parted Magic, but MiniOS is a newer free contender and really unique with a restorable session ability. Here I am going to explain how I easily make any USB or external drive bootable but still contain a large area for loose data.
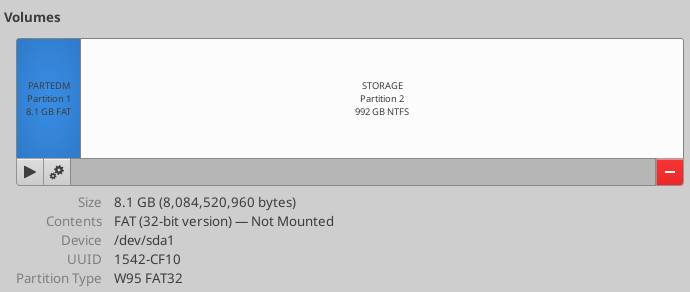
Create a FAT32 partition on the external device that can contain the ISO of the bootable image you want to extract. On a 1tb external drive, I carve out 8gb, then the remaining is NTFS.
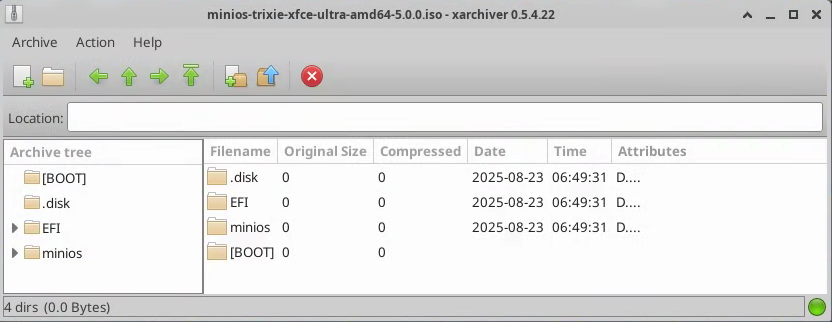
Open the ISO image you downloaded with an archive utility. Extract the contents onto the FAT32 partition. Below, I am using the XArchiver tool that is included with the XFCE desktop.
That’s it! Now you have a bootable external drive if you need it, or it can still be used as a regular loose data storage device.
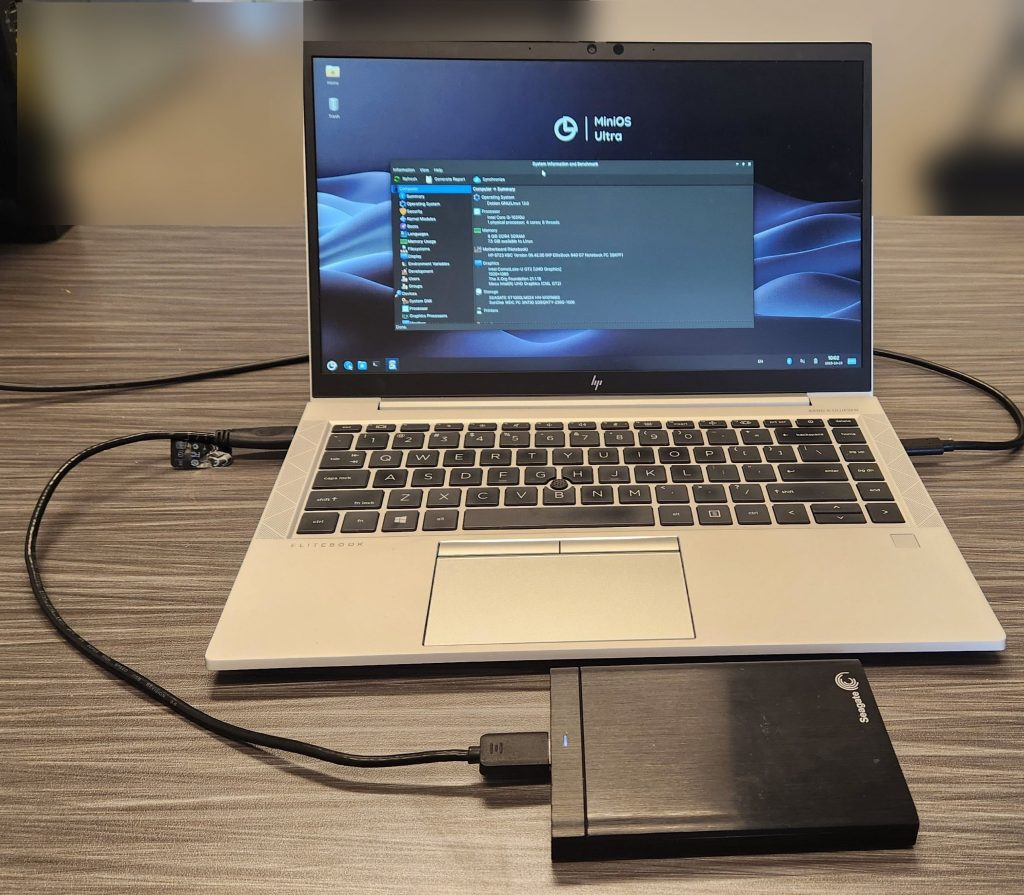
1 TB External drive booted the laptop to MinOS Ultra. Still have 997 gigs of free space.